Pages

Monday, August 31, 2015

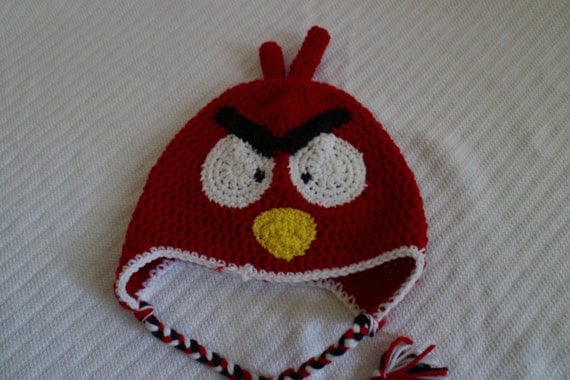
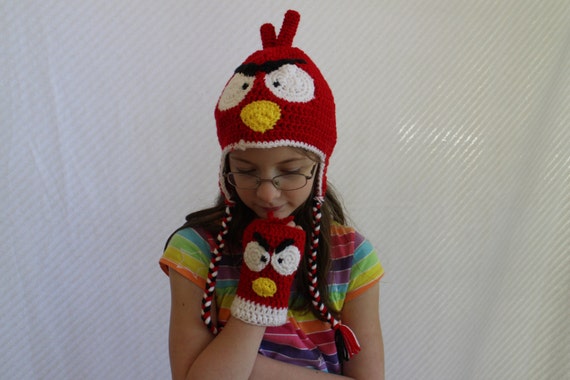
Angry Bird Red Hat

A while ago I posted my bomb angry bird hat pattern. Around the same time I created a red angry bird hat to, but I never got around to typing up the pattern. Luckily my notes were good enough that I was able to decipher what my pattern was.


The base of all my ear-flap hats is from RepeatCrafterMe's hat patterns, so the credit goes to her. I make most of my hats adult size because even children can wear them and have room to grow. You can get the base hat pattern here.

Materials
H Hook (5.0 mm)
Red Heart Yarn in White, Black, Red and Yellow
Tapestry Needle
Stuffing

I crocheted the base hat in red and then did the trim in white.

Now for the fun part: turning the plain hat into an angry bird!

Eyes (make 2)
Make with White Yarn
Magic ring, 6sc in magic ring and join to first sc, ch 2 (6 sc)
Round 1: 2 dc in each sc, join to first dc, ch 1 (12 dc)
Round 2: 2 sc in each dc, join to first sc, ch 1 (24 sc)
Round 3: *2 sc in first sc, sc in next sc* repeat (36 sc)
Tie off leaving a long tail to sew onto the hat

Take a piece of black yarn and embroider a black dot in the eye.

Nose
Make  with Yellow Yarn
Row 1: 8 fsc, ch 1, turn
Row 2: sc dec, sc 4, sc dec, ch 1, turn
Row 3: sc dec, sc 2, sc dec, ch 1, turn
Row 4: 2 sc dec, ch 1, turn
Row 5: sc dec
sc around the whole nose
tie off, leave long tail to sew onto hat

Eyebrows (make 2) 
Make with black yarn
Row 1: 10 fsc, ch 1, turn
Row 1: sc in each sc (10sc)
Tie off leaving a long tail to sew onto the hat

Longer Top Feather
Make with Red Yarn
6sc in magic ring
Round 2-10: sc in each sc

Smaller Top Feather
Make with Red Yarn
6sc in magic ring
Round 2-7: sc in each sc

Now lay all the pieces out and sew them on!


* While I've done my best to write up the pattern there may be errors. Let me know if you're having trouble following the pattern or if you see a mistake. Enjoy!
Monday, August 24, 2015

Granny Messenger Bag

I love the messenger bag I created using Moogly's pattern. Not only did I love the stitches she used, the bag was simple to make and put together. So I decided to design a bag of my own using the same technique to make a messenger bag.

I had a bunch of different stitches I thought would be perfect as a messenger bag but finally settled on a classic, granny stripes. I think it turned out great!


Materials
Pound of Love
I/9 crochet hook
Tapestry Needle

Front Piece: 13" wide by 12" long
Row 1: 52 fdc, turn
Row 2: ch 3, dc in first dc [skip 2 dc, 3 dc in next dc(cluster)} repeat until 3 dc are left, skip 2 dc, 2 dc in last dc, turn
Row 3: ch 3, work 3 dc in space between clusters, work cluster in each space, at the end dc in top of ch 3, turn
Row 4: ch 3, dc in space between previous ch 3 and 1st cluster, work cluster in each space, 2 dc in final pace, turn
Row 5: ch 3, work cluster in each spcae, dc in ch 3
Row 6- 33: Repeat rows 4 + 5

Back and Flap Piece: 13" wide by 24" long
Row 1: 52 fdc, turn
Row 2: ch 3, dc in first dc [skip 2 dc, 3 dc in next dc(cluster)} repeat until 3 dc are left, skip 2 dc, 2 dc in last dc, turn
Row 3: ch 3, work 3 dc in space between clusters, work cluster in each space, at the end dc in top of ch 3, turn
Row 4: ch 3, dc in space between previous ch 3 and 1st cluster, work cluster in each space, 2 dc in final pace, turn
Row 5: ch 3, work cluster in each space, dc in ch 3
Row 6- 66: Repeat rows 4 + 5

Side and Bottom Pieces: 3" wide by 37" long 
Row 1: 13 fdc, turn
Row 2: ch 3, dc in first dc [skip 2 dc, 3 dc in next dc(cluster)} repeat until 3 dc are left, skip 2 dc, 2 dc in last dc, turn
Row 3: ch 3, work 3 dc in space between clusters, work cluster in each space, at the end dc in top of ch 3, turn
Row 4: ch 3, dc in space between previous ch 3 and 1st cluster, work cluster in each space, 2 dc in final pace, turn
Row 5: ch 3, work cluster in each spcae, dc in ch 3
Row 6- 98: Repeat rows 4 + 5


Assembly
Line Up the Side and Flap Piece along the Front and Back Pieces.
Sc them together making sure to leave the flap open.


Sew a button to the middle 5th row at the bottom front of the bag.

Handle: 2" wide by 40" long
Row 1: 9 fdc, ch 2, turn
Row 2-80: DC in each dc, ch 2, turn

Sc around all the edges.

Lining
To make the bag extra sturdy as well as stop things from falling between the stitches. I used Muslin to line the bag because its not to expensive and it does the job.

I make it using two pieces.
First I cut a piece for the bottom of the bag. It needs to be a little bigger than the bottom to allow room for the seams. It should be about 4 1/2" wide by 14 1/2" long.

Then I cut a piece for the sides of the bag. It should be big enough to circle the whole bag, allowing room for the seams and longer than the height of the bag with extra room for the seams and to fold the top over to hide the raw edges. It should be about 35" wide by 16" long.

Now I sew the bigger piece of muslin closed and iron the seam open.


Then I pin the big piece to the bottom piece making sure the seam is on the outside.


I put the lining inside the bag to make sure it fits well and then fold down the top edge twice and pin it to hide the raw edges and make the lining the right height for the bag. I'm sure you could just fold and make sure the lining measures 12", but I like to check inside my bag to be sure.


It's also important to line the handles so they won't stretch.
I cut a piece that is 5" wide by 45" long. Fold the piece in from either side and then in half so that it is 2" wide.


Attaching
Once all the lining is sewn, pin the lining to the handle leaving the extra hang inside on either side. Sew the handle down.
Pin the lining inside the bag along the top row. Sew around the top row, making sure the go over the extra handle so that it is attached to the main bag lining as well.


* While I've done my best to write up the pattern there may be errors. Let me know if you're having trouble following the pattern or if you see a mistake. Enjoy!
Monday, August 17, 2015

Leia Lovey

I have been eyeing some lovey patterns online for a while and I finally broke down and bought one to try out. I used the Pretty Princess Lovey pattern by Briana Olsen because Amy McAnderson has a bunch of variations of this pattern to make the Disney princesses.

I wanted to start with a simple doll and since I love the Star Wars characters I've been crocheting I decided to make Leia as my fist lovey. She turned out great.


She is both a doll and a small security blanket, the perfect size for little hands. 


I'm not sure which princess I should make next. I'm thinking either Anna, Pocahontas, or the two-toned Aurora.

Monday, August 10, 2015

Nautical Knots Tote Bag

I love bags and the bigger the bag the better. This pattern was one of the few paid patterns I use. I got it because I wanted to make a friend something to encourage her to have fun over the summer and this looked like a great beach bag. 

It's called "Nautical Knots" Beach Yarn/ Tote Bag by Jennifer Pionk. The pattern came with instructions for two sizes. I made the smaller one because that suited my needs.


Sadly I forgot to take pictures of my first bag, but I decided I also needed a nice big bag. After some contemplation I decided to do it in Towson colors since I'm want to show my school spirit. I will definitely be using it to carry my books this fall though right now my yarn is in it.

I found the pattern easy to follow and I love how the top is double layered making it extra sturdy. Though the pattern didn't say to I lined my bag to make it extra durable. The stitches are pretty tight though and it didn't necessarily need the lining to be useful.

I also love the handles. I've never made handles like them and they are cool and easy to make. If you're looking for a big bag I would definitely recommend this pattern.


Monday, August 3, 2015

Doll Hat

So, I absolutely love the hats RepeatCrafterMe shares. They're perfect for little kids and those like me who will always be kids at heart. But I thought they would be even more perfect if I made matching doll hats. I loved matching my doll when I was little just like so many little girls.

This is the base hat I use for my doll hats

Materials
Size H/5.0mm hook
Worsted Weight Yarn- I use Red Heart Super Saver
Tapestry needle


Magic Ring, 11 dc in magic ring, join, ch 2
Round 2: 2 dc in each dc, join, ch 2 (22 dc)
Round 3: [2 dc, dc] repeat, join, ch 2 (33 dc)
Round 4-9: dc in each dc, join, ch 2 (33 dc)

Earflap
Ch 1, sc in next 8, ch 1, turn
Row 2: sc dec, sc in next 4, sc dec, ch 1, turn (6 sc)
Row 3: sc across (6 sc)
Row 4: sc dec, sc in next 2, sc dec, ch 1, turn (4 sc)
Row 5: sc across (4 sc)
Row 6: 2 sc dec, ch 1, tirn
Row 7: sc dec, tie off, weave in ends
Repeat for 2nd earflap

At any point on the hat join yarn and sc around the whole hat and ear flaps.

Weave in all the loose ends.


Then all the pieces have to be crocheted slightly smaller if you're using a RepeatCrafterMe Pattern so that they'll look right on the smaller hat, but how to do that varies by hat design.

* While I've done my best to write up the pattern there may be errors. Let me know if you're having trouble following the pattern or if you see a mistake. Enjoy!