Wednesday, December 31, 2014

Toothless Hat Pattern

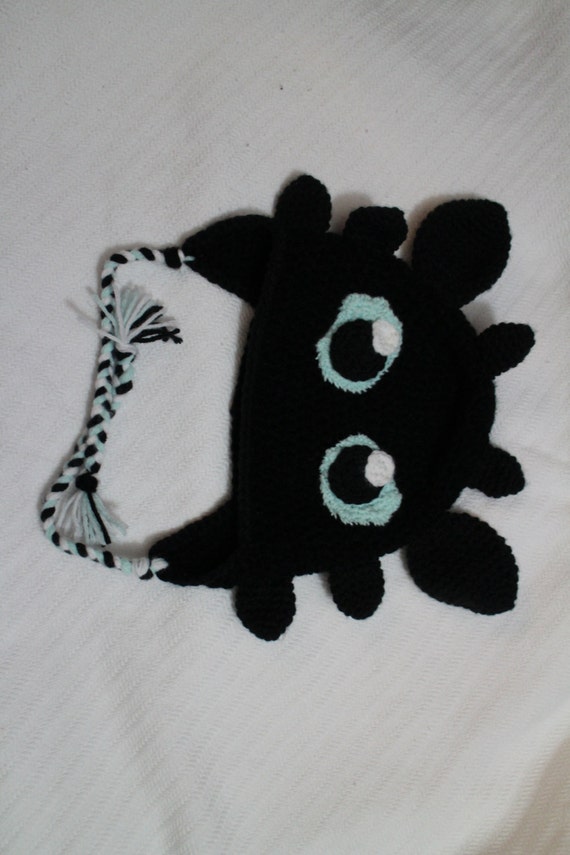
I loved this hat from the beginning, but was amazed at Christmas at how much my brothers loved this adorable toothless hat.

My younger brother has told me that he loves it so much he has to sleep in it. And my older brother wanted one of his own.


I created this pattern after seeing other toothless hats online, but this is my version.

Materials
Crochet Hook: I-9
Yarn: Red Heart Black, Poundbof Love White and Green
Yarn Needle

Base Hat
I start with a black version of repeatcrafterme's base hat. You can get the base hat pattern here.
I do the border in black as well
Taking 3 1yd strands of black and 4 1yd strands of green and white per side I slip them through the bottom of the flats and braid them.

Upper 'spike' on the top of his head -make 2
Make with black yarn
Round 1: sc 5 into magic ring, join to first sc, ch 1(5 sc)
Round 2: sc in each sc, join to first sc, ch 1 (5 sc)
Round 3: 2sc in each sc, join to first sc, ch 1 (10 sc)
Round 4-7: sc in each sc, join to first sc, ch 1 (10 sc)
Tie off leaving long tail to sew onto hat.

Ears -make 2
Make with black yarn
Round 1: sc 6 into magic ring, join to first sc, ch 1 (6 sc)
Round 2: sc in each sc, join to first sc, ch 1 (6 sc)
Round 3: 2sc in each sc, join to first sc, ch 1 (12 sc)
Round 4: sc in each sc, join to first sc, ch 1 (12 sc)
Round 5: *2sc in first sc, sc in next sc* repeat 6 times, join yo first sc, ch 1 (18 sc)
Round 6: sc in each sc, join to first sc, ch 1 (18 sc)
Round 7: *2sc in first sc, sc in next 2 sc* repeat 6 times, join to first sc, ch 1 (24 sc)
Round 8-10: sc in each sc, join to first sc, ch 1 (24 sc)
Round 11: *scdec, sc in next 2 sc* repeat 6 times, join to first sc, ch 1 (18 sc)
Round 12-13: sc in each sc, join to first sc, ch 1 (18 sc)
Round 14: *scdec, sc in next sc,* repeat 6 times, join to first sc, ch 1 (12 sc)
Round 15: sc in each sc, join to first sc, ch 1 (12 sc)
Tie off leaving long tail to sew onto hat.

Side spikes -make 4
Make with black yarn
Round 1:  sc 6 into magic ring, join to first sc, ch 1(6 sc)
Round 2: sc in each sc, join to first sc, ch 1 (6 sc)
Round 3: 2sc in each sc, join to first sc, ch 1 (12 sc)
Round 4-7: sc in each sc, join to first sc, ch 1 (12 sc)
Tie off leaving long tail to sew onto hat.

Back of eyes -make 2
Make with thinner green yarn
Round 1: 4 FSC, continue with 1 sc in the back of each stitch, join to first sc, ch 1 (8 sc)
Round 2: 2sc in first sc, sc in next 2 sc, 2sc in next 2 sc, sc in next 2 sc, 2sc in last sc, join to first sc, ch1 (12 sc)
Round 3: 2 sc in first 2 sc, sc in next 2 sc, 2sc in next 4 sc, sc in next 2 sc, 2sc in last 2 sc(20 sc)
Round 4: 2sc in first 3 sc, sc in next 4 sc, 2sc in next 6 sc, sc in next 4 sc, 2sc in last 3 sc, join to first sc, ch1 (32 sc)
Round 5: 2sc in first 4 sc, sc in next 8 sc, 2 sc in next 8 sc, sc in next 8 sc, 2sc in last 4 sc (48sc)
Tie off leaving long tail to sew onto hat.

Eye -make 2
Make with black yarn
Round 1: DC 8 in magic ring, join to first DC, ch 1 (8 DC)
Round 2: 2sc in each sc, join to first sc, ch 1 (16 sc)
Tie off leaving long tail to sew onto hat.

White glint in eye -make 2
Make with thinner white yarn
Round 1: sc 6 in magic ring, join to first sc, ch 1 (6 sc)
Round 2: 2 sc in each sc, join to first sc, ch 1 (12 sc)
Tie off leaving long tail to sew onto hat.


Assembly

First I like to sew my eyes together.
-First sew the black onto the green.
-Then sew the white on the edge of the black but still on the green.

Then I line everything onto the hat until I am satisfied with the arrangement. 
*The spikes and ears are sewn on as flat pieces so fold them in half and sew the bottom of each piece where it attaches to the hat.*
Using safety pins I attach the pieces where I want them and then one by one remove the safety pins when sewing the pieces on.


Hope you enjoy this pattern as much as I have! As always let me know of any problems in my pattern, I'm the only one who has used it.

7-21-15 Updated rounds 11 & 14 for the ears.

Monday, December 29, 2014

Merry Christmas!


I had a great Christmas and I hope you all did to. My favorite gifts to give just happen to be hand crocheted items that I have made with love, but I've had to keep them a secret for so long.
Now that Christmas is over I can share some of my secret creations with you!

Here are a few things I've made this Christmas season:

Toothless Hat


Little Red Riding Hood Doll


Olaf Scarves


As I finish editing their patterns those will be posted as well so you can make your own!

Thursday, December 11, 2014

Angry Bird Bomb Gloves Pattern

These fierce bomb gloves go perfectly with their bomb hat! I love finger-less gloves because they are quick to make, fun to wear and keep my hands warm when I'm outside or when I am working around the house.


Materials
Red Heart Yarn in black, red, yellow and grey
Hook: I
Tapestry/ Yarn Needle

This glove pattern starts at the bottom and works its way up the glove.

Base of the glove
Starting with grey yarn,
Round 1: fdc 25, join together to form a loop, ch 2 (25 dc)
Round 2: dc in each dc, ch 2 (25 dc)
Switch to black yarn,
Round 3- 7: dc in each dc, ch 2 (25 dc)

For right glove
Round 8: dc in 20 dc, ch 5, attach to beginning of round, ch 2 (20 dc, 5 ch)
Round 9: dc in each dc, dc in each chain (25 dc)
Round 10 - 11: dc in each dc (25 dc)
Round 12: sc in each dc (25 sc)
tie off leaving tail to sew onto glove

For left glove
Round 8: dc in 5 dc, ch 5, sk 5 dc and dc in last 15, attach to beginning of round, ch 2 (5 dc, 5 ch, 15 dc)
Round 9: dc in each dc, dc in each chain (25 dc)
Round 10 - 11: dc in each dc (25 dc)
Round 12: sc in each dc (25 sc)
tie off leaving tail to sew onto glove

Nose
With yellow yarn,
Row 1: 4 fsc, ch 1, turn
Row 2: sc dec twice, ch1, turn
Row 3: sc dec, continue to sc a border around the nose, tie off leaving tail to sew onto glove

Eyebrow
With red yarn,
8 ch, tie off leaving tail to sew onto glove

Feather
With black yarn
Row 1: 3 fsc, ch 1, turn
Row 2-3: sc in each sc, ch 1, turn
Switch to yellow yarn
Row 4: sc in each sc, tie off leaving tail to sew onto glove

Eyes
With white yarn,
Round 1: 6 sc into magic ring
Round 2: 2 sc in each sc
Switch to grey yarn
Round 3: *2 sc in first sc, sc in next sc* repeat 6 times
tie off leaving tail to sew onto glove

Friday, November 28, 2014

Santa Hat


It's Christmas Time!

I love the Christmas season; I love the songs, I love the family time, and I love the gifts! Actually I love making and giving the gifts. I love seeing people love what I have created and sometimes it is hard to wait to give my gifts until Christmas day. 

I plan Christmas gifts throughout the year as ideas strike me since making the majority of my gifts takes time and not only do I need time, I need time when the recipient is not around. Making things in secret is the most difficult part.

While Santa may not be real, his hat is the perfect addition this holiday season.


Sunday, November 23, 2014

Morning Frost Winter Hat


Winter is coming and with it (more like before it) the cold is coming as well. As the weather turns I have turned my attention to trying out new winter hat patterns. So far I've done mostly animal hats, but more colorful hats are fun as well.

This pattern is from ELK Studio and can be found here. She has many beautiful hat and scarf patterns, some of which are free and some of which are paid.

I like this patterns so much I had to try it out in multiple colors. 


Monday, October 13, 2014

Puppy Break

Who could resist this adorable face? I know I can't and so does he.


I don't like to do anything without my puppy unless there is no other alternative. So when I am working on anything at home he is always with me. As I was switching the item I was shooting pictures in preparation for my etsy shop Benson decided to get in on the action.


 He decided if I wasn't going to play with him I should take his picture and he wasn't going to move until I complied. That said it really wasn't all that hard for him to convince me; i love taking pictures of him.


Maybe some time I'll give him something to model. I don't know if he would be as excited about that since he hates being dressed up. I'm not even sure I'll dress him up for Halloween. Maybe i'll just make him something simple like a cape. Then he can be superpuppy!


Thursday, October 9, 2014

Bomb Angry Bird Hat Pattern

Bomb Angry Bird Hat Pattern


The bomb bird is a fun and feisty. He is a great help in the angry bird app as he blows up obstacles you encounter. Now he can perch on your head and keep you warm as you demolish obstacles out in the snow this winter.


The base of all my ear-flap hats is from RepeatCrafterMe's hat patterns, so the credit goes to her. I make most of my hats adult size because even children can wear them and have room to grow. You can get the base hat pattern here.

Materials
H Hook (5.0 mm)
Red Heart Yarn in White, Black, Red, Grey and Yellow
Tapestry Needle

I crocheted the base hat in black and then did the trim in grey.

Now for the fun part: turning the plain hat into an angry bird!

Eyes (make 2)
Start with black yarn
Magic ring, 6sc in magic ring and join to first sc, ch 2 (6 sc)
Switch to white yarn
Round 1: 2 dc in each sc, join to first dc, ch 1 (12 dc)
Round 2: 2 sc in each dc, join to first sc, ch 1 (24 sc)
Switch to grey yarn
Round 3: *2 sc in first sc, sc in next sc* repeat (36 sc)
Tie off leaving a long tail to sew onto the hat

Nose
Use yellow yarn
Row 1: fsc, ch 1, turn
Row 2: scdec in first sc, sc in next 4 sc, scdec in next sc, ch 1, turn (6 sc)
Row 3: scdec in first sc, sc in next 2 sc, scdec in next sc, ch 1, turn (4 sc)
Row 4: scdec in each sc, ch 1, turn (2 sc)
Row 5: scdec in sc, ch 1 (1 sc)
Continue to sc arounf the whole piece for a nice border
Tie off leaving a long tail to sew onto the hat


Eyebrows (make 2) 
Use red yarn
Row 1: 10 fsc, ch 1, turn
Row 1: sc in each sc (10sc)
Tie off leaving a long tail to sew onto the hat


"Feather"/Hair - I'm not sure what it is
Start with yellow yarn
Magic ring, 6sc in magic ring and join to first sc, ch 2 (6 sc)
Round 1: 2 sc in each sc, join to first sc, ch 1 (12 sc)
Round 2-3: sc in each sc (12 sc)
Switch to black yarn
Round 4-11: repeat round 2
Tie off leaving a long tail to sew onto the hat


Position the pieces nicely on the base hat until you like the arrangement and then sew them all on. 


Printfriendly