Monday, July 13, 2015

Boy Messenger Bag

While me and my sister were enjoying our new messenger bags my brother decided he would like one as his own. I often feel bad that I crochet my sister so many things and barely make my brother anything buy she loves everything I make and I fall in love with more feminine patterns.

After a bit of searching I was unsatisfied with the messenger patterns available online so I decided I would make my own using the technique I used to make my sister's bag. But his was going to be simply double crocheted.


Sadly I didn't record my stitch counts, but it is a simple pattern so I'll explain what I did.
Materials
Simply Soft and Pound of Love Yarn
Hook: I
Tapestry/ Yarn Needle

Base Rectangle
Row 1: fsc until it reached 15 inches long.
Rows 2-?: sc in each stitch until it is 3 inches long

Sides
Attach yarn to one corner, ch 1
Round 1: sc in each stitch around in each sc, join
Round 2: ch 2, dc in each sc, 
Round 3-(26): ch 2, dc in each dc (until the sides are 10 inches tall; don't tie off)
Flap
Row 1: dc along the back (the # fdc used for the base rectangle), turn
Row 2-(26): ch 2, dc in each dc (until the flap is 10 inches long), tie off

Handle
Row 1: On one side of the flap dc (the # rows in base rectangle), turn
Row 2- (34): ch 2, dc in each dc
Repeat on other side of the flap
Sew their edges together. (You can make the handle longer or shorter based on your preference by adding or subtracting rows.)

You can use any stripe pattern or make the bag on e plain color, but the color sequence I used was:
4 turquoise
2 black
4 green
2 black

Then I lined the bag. The handle is folded and stitched together with some fabric lining inside to make it more sturdy and stop it from stretching.

It looks great for a boy and he calls it his satchel. 
Now all three of us have bags we constantly use. His first excursion with his new bag was to the library where he filled it full of books. It made me cringe slightly to see so much weight in it, but it is holding up nicely.

* While I've done my best to write up the pattern there may be errors. Let me know if you're having trouble following the pattern or if you see a mistake. Enjoy!

Monday, July 6, 2015

Rainbow Messenger Bag

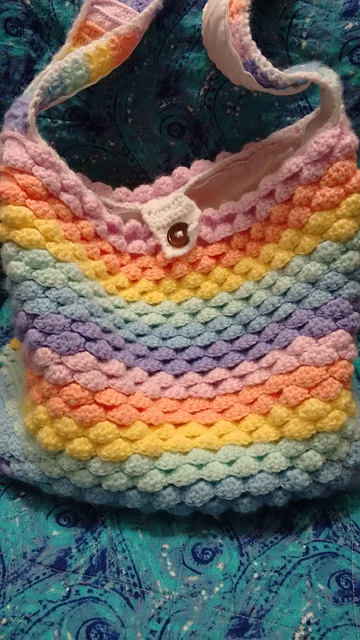
Since I love my messenger bag so much my sister thought she should have one too. My messenger bag is perfect for me and when browsing the internet I found one that was perfect for her to.

I made my sister a rainbow bag and she loved it. It is the Spring Messenger Tote by Susan Gater on Ravelry. I love the pattern, but it was more time consuming for me to make. 

To make her bag durable I lined it as well. I didn't take pictures when making the lining, but maybe later I'll explain how I create my linings.


 She now uses her bag just as much as I use mine.

Now I want to try out her Spring Petals Backpack but that'll have to wait until I finish some of my current projects.

Monday, June 29, 2015

Moogly's Mesmerizing Messenger Bag

I'll start out by sharing a bag I have fallen in love with and use constantly:

I love messenger bags! And I love this simple yet elegant stitch pattern. Before making the bag I thought they might be difficult to make, but moogly explains and illustrates her simple steps  very well so that I had no problem making my bag.


Moogly gives her own instructions for how to line the bag. Lining crocheted bags is well worth it. It makes the bag so much more durable, it stretches less and nothing falls through the stitching. I sewed my lining a little differently than she did but it turned out great.


This is the bag I use the most now. I use it when shopping for more yarn, going to work or heading out on errands. I've got so many compliments on this bag I almost want to make another one, but my want to crochet list is a little long so I might not get to that for a while.

Saturday, June 27, 2015

Catching Up

So, I haven't posted in a while, a very long while. Work and school have been taking up much of my time. Even though I've been busy I have still found time to crochet. I've tried various new patterns, some I love and others were worth the experience but I won't be attempting again for a while.

I'm working on some posts about patterns I've fallen in love with and others that I have created.

Also, I have created an Instagram account so I can post pictures of what I'm working on and follow some other crocheters. I haven't posted much yet, but it'll be coming soon so don't miss it!


Monday, January 19, 2015

Olaf Scarf #2

Another Olaf Scarf!

This Olaf scarf is more 3-d than my first one. But the fun thing about multiple Olaf scarf patterns is you can mix and match the sides to create your own combination. 
I love Olaf!


Materials
Yarn: Pound of Love in White and Orange
          Simply Soft Black and Brown
Hook: I-9
Yarn Needle
For this scarf I crochet on side, then beginning in the middle I repeat on the other side.

Starting on the white side
Row 1: 15 fdc, ch 2, turn
Row 2-60: dc in each dc, ch 2, turn

Other Side also in white
Row 1: dc in the bottom of each fdc (15 dc)
Row 2-60: dc in each dc, ch 2, turn

Eyebrows -make 4
With brown yarn
ch 8, tie off leaving tail to sew on

Eyes -make 4
With black yarn
Round 1: 6sc in magic ring, join to first sc, ch 1 (6 sc)
With white yarn
Round 2: 2sc in each sc, join to first sc, ch 1(12 sc)
in black sew onto scarf

Nose -make 2
Round 1: 6 sc in magic ring (6 sc)
Round 2-4: sc in each sc, join to first sc, ch 1 (6 sc)
Round 5: *2sc in first sc, sc in next 2 sc* repeat twice, join to first sc, ch 1(8 sc)
Round 6-9: sc in each sc, join to first sc, ch 1 (8 sc)
Tie off leaving long tail to sew on

Mouth -make 2
Row 1: 6 dc into magic ring, do not join to first dc, ch 1, turn (6 dc)
Row 2: 2 dc in each dc, ch 1, turn(12 dc)
Row 3: *2dc in first dc, dc in next* repeat, ch 1 (18 dc)
Hdc along bottom, tie off leaving long tail to sew on

Teeth make 2
With white yarn
Row 1: 4fdc, ch 1, turn (4 dc)
Row 2-3: dc in each dc, ch 1, turn (4 dc)
tie off leaving tail to sew on

Buttons - make 6
With black yarn
Round 1: 6 sc in magic ring, ch 1, turn (6 sc)
Round 2: 2 sc in each sc, tie off leaving tail to sew on (12 sc)

Hair
side hairs- make 4
With brown yarn
ch 8, tie off leaving tail to sew on
middle hair- make 2
With brown yarn
ch 10, tie off leaving tail to sew on

Arms - make 4
12 fdc, 
Hand at end of arm ch4, tie off leaving extra yarn to sew back in
attach yarn, ch 4 (3 times)- total of 4 fingers

Lay out the pieces and sew them on either side.

Monday, January 12, 2015

Olaf Scarf Pattern #1

When I think of winter I think of bundling up to go out and build a snowman. But here's a snowman you can 'build' inside that will keep you warm when you go outside to brave the cold throughout the winter!


Materials
Yarn: Pound of Love in White, Blue, and Orange
          Simply Soft Black and Brown
Hook: I-9
Yarn Needle

For this scarf I crochet on side, then beginning in the middle I repeat on the other side.

Starting on the white side
Row 1: 15 fdc, ch 2, turn
Row 2-60: dc in each dc, ch 2, turn

Blue Side
Row 1: dc in the bottom of each fdc (15 dc)
Row 2-60: dc in each dc, ch 2, turn


Eyebrows -make 2
With brown yarn
ch 8, tie off leaving tail to sew on

Eyes -make 2
With black yarn
Round 1: 6sc in magic ring, join to first sc, ch 1 (6 sc)
Switch to white yarn
Round 2: 2sc in each sc, join to first sc, ch 1(12 sc)
Switch to blue yarn
Round 3: *2sc in first sc, sc in next sc* repeat 6 times, join to first sc, ch 1 (18 sc), tie off leaving tail to sew on

Nose
Row 1: 4fsc, ch 1, turn
Row 2: sc in each sc, ch 1, turn (4 sc)
Row 3: scdec twice, ch 1, turn (2sc)
Row 4: sc in each sc, ch 1, turn (2sc)
Row 5: scdec, ch 1, turn (1 sc)
Row 6: sc, tie off leaving tail to sew on

Mouth
With black yarn
Row 1: 8 fsc, ch 1, turn (8 sc)
Row 2: sc in each sc, ch 1, turn (8 sc)
Row 3: scdec, sc in next 4 sc, scdec in last sc, ch 1, turn (6 sc)
Row 4: sc in each sc, ch 1, turn (6 sc)
Row 5: scdec, sc in next 2 sc, scdec, ch 1, turn (4 sc)
Row 6: sc in each sc, ch 1, turn (4 sc)
Row 7: 2 scdec, ch 1, turn (2 sc)
Row 8: sc, tie off leaving tail to sew on

Teeth
With white yarn
Row 1: 4fdc, ch 1, turn (4 dc)
Row 2-3: dc in each dc, ch 1, turn (4 dc)
tie off leaving tail to sew on

Buttons - make 3
With black yarn
Round 1: 6 sc in magic ring, ch 1, turn (6 sc)
Round 2: 2 sc in each sc, tie off leaving tail to sew on (12 sc)

Lay out pieces and sew onto the white side of the scarf.

Tassels -on both sides of scarf
Cut strands of white yarn, taking 3 of them loop through the bottom of the scarf

Now for the part of the scarf that I am not experiences at.
On the blue side embroider "I Like Warm Hugs" and add snowflakes around it. When I embroidered it I tried to keep all the yarn on one side so the back still looks plain blue.


What a cute scarf! It looks so fun and goes perfectly with my other Olaf accessories.


But, I created 2 types of Olaf scarves. Soon I will have the second pattern posted.


Monday, January 5, 2015

Little Red Riding Hood Flip Doll Pattern

I think this flip doll pattern is a little simpler than my Anna/Elsa doll mainly because there aren't color changed throughout the dolls dress. But you do have to make two faces on one of the head to be both the grandmother and the wolf.


Materials

Yarn in Skin color, red, brown, grey, white and light blue
Embroidery Thread in Red
Eyes- 3 sets
Crochet Hook- D:3.25mm
Needle for yarn sewing
Stitch Marker

Since this pattern is basically another pattern with just color changes, click here to see the pattern and next I'll make note of the color changes so read my whole adaptation before starting your doll.

Body

The first side I started with was the red riding hood side:


Make the head in skin color: Rounds 1-15
Then change to red for the shirt: Rounds 16-20
Change to light blue for the start of the Grandma/Wolf side: Rounds 21-26
Now it gets a little complicated as we make one side of the head mostly grey for the wolf but keep the other side skin color for the grandmother. So I'll write out the directions and color changes:
Grey(G), Skin(S)
Round 27: (G) sc in first sc, (S) sc in same st, *sc in next sc, 2sc in next sc,* (2 times), (G) sc in next sc, (S) *2sc in next sc, sc in next sc* (3 times) (18 sc)
Round 28: (G) 2 sc in first sc, (S) *sc in next 2 sc, 2sc in next sc* (2 times), (G) sc in next 2 sc, (S) *2sc in next sc, sc in next 2 sc* (3 times) (12 sc)
Round 29: (G) 2 sc in first sc, sc in next sc, (S) sc in next 2 sc, 2 sc in next sc, sc in next 3 sc, 2 sc in next sc, (G) sc in next 3 sc, (S) *2 sc in next sc, sc in next 3 sc* repeat (3 times) (30 sc)
Round 30: (G) 2 sc in first sc, sc in next 2 sc, (S) sc in next 2 sc, 2 sc in next sc, sc in next 4 sc, 2 sc in next sc, (G) sc in next 4 sc, (S) *2 sc in next sc, sc in next 4 sc* repeat (3 times) (36 sc)
Round 31-32: (G) sc in first 4 sc, (S) sc in next 10 sc, (G) sc in next 4 sc, (S) sc in next 18 sc (36 sc)
Round 33: (G) sc in first 5 sc, (S) sc in next 8 sc, (G) sc in next 5 sc, (S) sc in next 18 sc (36 sc)
Round 34: (G) sc in first 6 sc, (S) sc in next 6 sc, (G) sc in next 6 sc, (S) sc in next 18 sc (36 sc)
Round 35: (G)st2tog, 1 sc in next 4 sc, st2tog, (S) sc in next 3 sc, (G) sc in next sc, st2tog, sc in next 4 sc, (S) *st2tog, sc in next 4 sc* repeat (3 times) (30 sc)
Round 36: (G) *st2tog, sc in next 3 sc* repeat (3 times) (S) *st2tog, sc in next 3 sc* repeat (3 times) (24 sc)
Put the eyes in on both sides of the head.
Rounds 37-39 all in grey

Arms

Red Riding Hood: Red, then skin
Granny/Wolf: Blue, then skin

Skirt

Red Riding Hood: Red Skirt
Granny/Wolf: Blue Skirt

Granny/Wolf Apron

Make it the same way as Cinderella's apron

Bonnet

Row 1: sc 27 into the middle of granny/wolf head along the 'dividing line' between their faces, ch1, turn (27 sc)
Row 2: sc in each sc, ch1, turn (27 sc)
Row 3: 2 sc in first sc, sc in next 25 sc, 2 sc in last sc, ch1, turn (29 sc)
Row 4- 8: sc in each sc, ch1, turn (29 sc)
Row 9: *st2tog, 4sc* repeat, ch1, turn
Row 10: *st2tog, 3sc* repeat, ch1, turn
Row 11: *st2tog, 2sc* repeat, ch1, turn
Row 12: st2tog repeat
sew together
sc border
To create 'lace' edging: ch3, sk1, sl next across the edge of the bonnet

Wolf Nose

Round 1: 6 sc in ring
Round 2: 2 sc in each sc (12sc)
Round 3 &4: sc in each sc (12sc)


Red's Hood

Row 1: 21 fsc
Row 2-7: sc in each sc, ch1, turn
slip stitch closed
sc in bottom of fsc
Row 1: scdec in first sc, sc in next sc until last sc, scdec in last sc (19)
Row 2: scdec in first sc, sc in next sc until last sc, scdec in last sc (17)
Row 3-9: dc in each sc 6
sc border
near neck sc 20 ch on both sides

Hair

Red Riding Hood: Brown
-Cut strands of yarn twice the length of the doll
-Lay it across the top of the head and sew them down along the middle of her head
Granny: Grey
-With a few strands of yarn, sew from the grey part of the head to her bonnet to create something like bangs


Printfriendly