Showing posts with label crochet. Show all posts

Monday, July 20, 2015

My Favorite Purse Pattern

I found a crochet purse pattern a while ago that I absolutely love! It uses African flower motifs as the main design. The flowers are very pretty and using different color combinations creates a totally new look for each new bag.

Here are just a few that I have created:


So far those are my favorite purses. I've made one for myself which I use all the time and my sister loves hers as well. I'm so happy my mom showed me how to sew the linings for the purses; it makes the purses so much sturdier. They don't stretch out and nothing falls through the little holes in the crochet part.
Here's the link to the pattern African Flower Bag.

Sunday, October 5, 2014

Angry Bird Crochet

My newest project is something that I have been designing myself.

I'm not sure why but I wanted to make something Angry Birds which is kind-of weird since I don't really play it all that much. I saw that there are a fair amount of hats, mainly red, chuck and the bomb, but I decided I wanted to take the idea, but do it as finger-less gloves.

I had so much fun designing one that I decided to do them all. So here are my designs for most of the original birds.


Then my sister said I should make the new birds from Angry Birds Stella. The Stella version seems to be geared towards the girls so most of the birds are girls. And here;s those designs. Except that I got the color scheme for Dahlia all wrong, but that's easily fixed since I haven't made her yet.


And here are the birds that I crochet so far.


I love the idea of matching gloves and hats so I decided to enlarge the glove pattern and created a hat to go with my bomb glove.


I love that the gloves are so fun and fairly quick to make. But now I'll have to make hats to match them all which should just involve enlarging the glove pattern design.


 And finally my model, showing of the coolness and fierceness of the angry bird bomb. 

But she says I should make an angry bird Stella hat because she's never seen them before, but I think she just likes that it's pink!


Thursday, September 11, 2014

Panda Hooded Scarf

My most recent crochet project was a panda hooded scarf. I found a pattern to make a Cat Scoodie and I loved the idea, but I'm not into cats so I wanted to do it differently. After searching the internet for ideas I decided upon a panda bear!


It turned out great and was a very simple pattern to follow. I know I'll probably be  making more panda's or variations on this pattern. It's just to cute to resist!

The hood fits nicely and with the scarf the length of your arms the pockets at the end are a great place to put your hands for warmth or fun or a nice pocket for little things if you don't have pockets and aren't going to go swinging the scarf around your neck.


 I also learned something new when creating this scarf. While the scarf could have been started with a long chain, the pattern linked to a tutorial on how to do a foundation double crochet. I now love that stitch! I always found the foundation row tedious because I had to find each chain to stitch into, but with the foundation double crochet I can do both my chain and my first row at the same time. I'm sure I'll tweak future patterns and start with this instead of chains.


And of course my puppy let me know if I was going to be taking pictures he needed to be included. Plus his black fur shows up so nicely on a white backdrop.

Now I'll just have to wait for cooler weather to use the hood, but I am in no rush for that. I like the warmth and sun.

Saturday, August 30, 2014

Anna/Elsa Pattern

This pattern is my tweaking of the previous Cinderella Doll pattern, therefore much of the credit goes to that creator. But I did put in a good deal of time and trial and error to create this unique doll, especially on the Anna side.

Materials:
Yarn in Light Blue, Dark Blue, Skin, Black, Yellow, Dark Pink, White, Brown
Embroidery Thread Brown, Red, Green, Pink
Eyes
Crochet hook D: 3.25mm
Needle for wool sewing.
Stitch marker

The doll is crocheted from the head of Anna through her body, switches to Elsa’s Body and finished with her head. The skirt is crocheted onto their bodies. I used continuous circles when crocheting them.


Start with Anna side:
1) With skin color yarn: Magic Ring with 6 st. (6)
2) 2sc in each sc around (12)
3) *2sc in first sc, 1sc in next sc* repeat from * to* (18)
4) *2sc in first sc, 1sc in next 2 sc* repeat from * to* (24)
5) *2sc in first sc, 1sc in next 3 sc* repeat from * to* (30)
6) *2sc in first sc, 1sc in next 4 sc* repeat from * to* (36)
7 to 10) 1sc in each sc around (36)
11) *scdec, 1sc in next 4 sc*, repeat from * to* (30)
12) *scdec, 1sc in next 3 sc* repeat from * to* (24)
-         Attach eyes and start to stuff the head
-         Embroider eyebrows and mouth (if you want to) (I like to wait till after my whole doll is crocheted before doing my embroidery, but it is up to you)
I have found it easier to wait until the Anna half is done before attaching the eyes so that I can make sure they line up with the design of her shirt.
13) *scdec, 1sc in next 2 sc* repeat from * to* (18)
14) *scdec, 1sc in next sc* repeat from * to* (12)
-         Finish stuffing the head.
Now we will be jumping between light blue (LB), skin color (S), black (BK) and yellow (Y) to create the shirt portion of Anna’s dress.
15) (LB) *2sc in first sc, 1sc in next sc* (2x), 2sc in next sc, (S) 1sc in next sc, 1sc in next sc, (LB) 1sc in same sc,1 sc in next sc, *2sc in next sc, 1sc in next sc * (2x) (18)
16) (BK) 2sc in first sc, 1sc in next 5 sc, (Y) 1sc in next sc, (LB) 1sc in same sc, 1sc in next 4 sc, (Y) 1sc in next sc, (BK) 2sc in next sc, 1sc in next 5 sc (21)
17) (BK continued) 1sc in next 8 sc, (Y) 1sc in next sc, (LB) 1sc in next 3 sc, (Y) 1sc in next sc, (BK) 1sc in next 8 sc (21)
18) (BK continued) 2sc in first sc, 1sc in next 6 sc, 2sc in next sc, 1sc in next 2 sc, (Y) 1sc in next 2 sc, (BK) 1sc in next 2 sc, 2sc in next sc, 1sc in next 6 sc (24)
            -Continue next few rows in black
19) 1sc in each sc around (24)
20) 1sc in each sc around; back loop only (24)
-Attach Anna's eyes and embroider the eyebrows and mouth.
            -Switch to Light Blue yarn
21) In (LB) yarn (we are beginning Elsa): 1sc in each sc around; back loop only (24)
22) 1sc in each sc around (24)
23) *scdec, 1sc in next 6 sc*, repeat from * to* (21)
24) 1sc in each sc around (21)
25) *scdec, 1sc in next 5 sc*, repeat from * to* (18)
- Stuff body
- Switch to skin color
26) (S) *scdec, 1sc in next sc* repeat from * to* (12).
27) *2sc in first sc, 1sc in next sc* repeat from * to* (18)
28) *2sc in first sc, 1sc in next 2 sc* repeat from * to* (24)
29) *2sc in first sc, 1sc in next 3 sc* repeat from * to* (30)
30) *2sc in first sc, 1sc in next 4 sc* repeat from * to*(36)
31 to 34) 1sc in each sc around (36)
35) *scdec, 1sc in next 4 sc*, repeat from * to* (30)
36) *scdec, 1sc in next 3 sc* repeat from * to*(24)
-         Attach eyes and start to stuff the head
-         Embroider eyebrows and mouth (if you want to)
37) *scdec, 1sc in next 2 sc* repeat from * to* (18)
38) *scdec, 1sc in next sc* repeat from * to* (12)
- Finish stuffing the head.
39) scdec in each sc all around, fasten off all last 6sc together.

Arms: (make 4, 2 in Light Blue yarn, 2 in Blue + Yellow)
1) Skin Yarn: Magic Ring with 6 sts. (6)
2) *2sc in first sc, 1sc in next sc* repeat from * to* (9)
3) *scdec, 1sc in next sc* repeat from * to* (6)
4) 1sc in each sc around (6)
Elsa- still Skin color    Anna- change to Light Blue
5) 1sc in each sc around (6)
Elsa- Change to Light Blue            Anna- continue Light Blue
6) *2sc in first sc, 1sc in next sc* repeat from * to* (9)
Elsa- continue Light Blue            Anna- Change to Yellow
7) *scdec, 1sc in next sc* repeat from * to* (6) Fasten off. Leave yarn enough to sew the arms to the body.

-         Sew Arms on to respective sides


Skirt: (make 2, one sky Light Blue and another Dark Blue with Black point and Yellow Outline)

Anna

1) Pick up 24 sts in the row 20 of the body, catching the front loops that were left free. (Y) 1sc in next 12 sc, (BK) 1sc in next 6 sc, (Y) 1sc in next 5 sc (24).
You can pick and part to start, but if you catch them starting at the very beginning of row 20, they’ll line up. If not you’ll have to adjust.
2) (DB) *2sc in first sc, 1sc in next 3 sc* (3X)  2sc in next sc, (Y) 1sc in next sc, (B) 1sc in next 4sc, (Y) 1sc in next sc, (DB) 2sc in next sc, 1sc in next sc, 2sc in next sc, 1sc in next 2 (30)
3) (Continue DB) *2sc in first sc, 1sc in next 5 sc* (2X) 2sc in next sc, 1sc in next 4 sc, 2sc in next sc, (Y) 1sc in next sc, (BK) 2sc in next sc, (Y) 1sc in next sc, (DB) 2sc in next sc, 1sc in next 7 sc (35)
4) (Continue DB) *2sc in first sc, 1sc in next 6 sc* (3X), 2sc in next sc, 1sc in next sc, (Y) 2sc in next sc, (DB) 1sc in next 3 sc, 2sc in next sc, 1sc in next 6 sc (40)

From this point on both skirts are the same just in different colors
5) *2sc in first sc, 1sc in next 7 sc* repeat from * to* (45)
6) *2sc in first sc, 1sc in next 8 sc* repeat from * to*(50)
7) *2sc in first sc, 1sc in next 9 sc* repeat from * to* (55)
8) *2sc in first sc, 1sc in next 10 sc* repeat from * to*
(60)
9 a 22) 1sc in each sc around (60)
Fasten off.

With Light Blue Yarn pick up the 24 sc in the same way, but in the row 21, in the black portion. Continue in the same way as the previous skirt after row 4.
2) *2sc in first sc, 1sc in next 3 sc* repeat from * to* (30)
3) *2sc in first sc, 1sc in next 5 sc* repeat from * to* (35)
4) *2sc in first sc, 1sc in next 6 sc* repeat from * to* (40)

When you have ready both skirts, you'll have to join both with light blue yarn, sc through both skirts, to hold them together


Hair- I have to admit that while I crochet a lot I don’t have much experience with doll hair Therefore, while I found a way to make their hair, I am not confident that I did it the right way. Therefore take my hair instructions as a suggestion, but you might want to do your own ‘hair research’ to be sure of what works.

Anna

With Brown Yarn
Cut lots of strands twice the length of the doll
Lay flat across her head
Sew/Secure each strand down the middle of her head
Sew/Secure each strand again halfway down the side of Anna’s head
Braid two side braids
Tie together with a strand of her hair
Trim the extra lengths of ‘hair’

Elsa

With White Yarn
Cut lots of strands twice the length of the doll
Fold in half and line up along front of head
Secure/Sew each ‘loop’ along the front of her head
Sew/Secure them again halfway down the back of her head
Braid one long braid
Tie together with a strand of her hair
Trim the extra lengths of ‘hair’


Anna’s Cape
I hope this pattern is understandable. I created Anna's cape completely on my own in the best way I knew how, but there may be better ways to accomplish the same result.
In this part of the pattern there are parts a, b, and c of the first few rows. a is the first half-circle(ish) part, b is the middle part that extends down to be the cape part and c is the second half circles. The half-circles come around the front of Anna's neck to while the rest of the cape will extend down her back.

Chain 31
1a) sc in 2nd ch from hook, 1 sc in next 6 sc, turn (7)
2a) ch 1, scdec, 1 sc next 3 sc, scdec, turn (5)
3a) ch 1, scdec, 1 sc in next sc, scdec, turn (3)
4a) ch 1, 1 sc in next sc, sk 1, 1 sc in next sc (2)
sl st down to foundation ch
1b) sl st in next 2 sc, 1 sc next 12 sc, sl st in next 2 sc
1c) 1 sc next 7 sc, turn (7)
2c) ch 1, scdec, 1 sc next 3 sc, scdec, turn (5)
3c) ch 1, scdec, 1 sc in next sc, scdec, turn (3)
4c) ch 1, 1 sc in next sc, sk 1, 1 sc in next sc (2)
sl st down to foundation ch
2b) sl st in 2 sl stitches, 1 sc next 12 sc, turn
3b-4b) ch 1, 1 sc in each sc (12)
5) 2sc in first sc, 1 sc next 10 sc, 2sc in next sc(14)
6) 1 sc in each sc
7) 2sc in first sc, 1 sc next 12 sc, 2sc in next sc(16)
8) 1 sc in each sc
9) 2sc in first sc, 1 sc next 14 sc, 2sc in next sc (18)
10) 1 sc in each sc
11) 2sc in first sc,1  sc next 16 sc, 2sc in next sc (20)
12-17) 1 sc in each sc
18) sc dec, 1 sc next 16 sc, sc dec (18)
19) 1 sc in each sc
20) sc dec, 1 sc next 14 sc, sc dec (16)


I am planning on creating a cape for Elsa as well, but right now I’m not sure how I want to proceed. But maybe that will come later.


12/10/14 - After making this doll a few more times I found some directions that needed editing. Old directions are crossed out and the new ones or changed ones have their round number highlighted.

Monday, August 25, 2014

Anna/Elsa Topsy Turvy Doll

I created my own doll by adjusting and adding to the pattern I used previously to crochet Cinderella. This is Anna and her sister Elsa from the movie Frozen.

I love both sides of my doll, but I have a special fondness for the Anna side. I was able to capture more of her dress detail than I was for Elsa. I love the blue dress Anna wears much more than her green one so that is the one I created. 


I haven't completely finished the doll. I want to make Elsa a cape, but while I work on that part of the pattern I thought I should post the main part of the doll.

Later I plan on posting the pattern, hopefully soon. Being the first real pattern I am 'writing'/adjusting I am in the process of deciphering my jotted notes. Hopefully when I am finished it will be usable to others.


I crochet so my knowledge of knitting is limited, but in my perusal of the internet to glean ideas from others who have recreated Anna/Elsa I did run across a knit pattern for them.
I have no idea if those patterns are good or not, but if you knit and want to try it I wanted to let you know the option is out there. You can also tweak them to create the perfect doll for your tastes.


And maybe later I'll create my own coronation princesses, but for now my creation is perfect for me. 


Friday, August 22, 2014

Topsy Turvy Doll

While there are a few newly crocheted projects that I have not shared, I recently found a pattern that is really neat so I'll share it first.


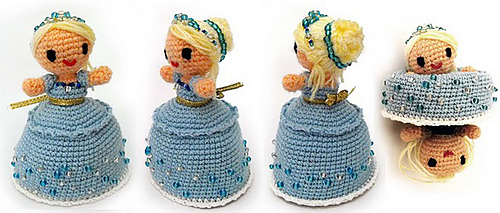
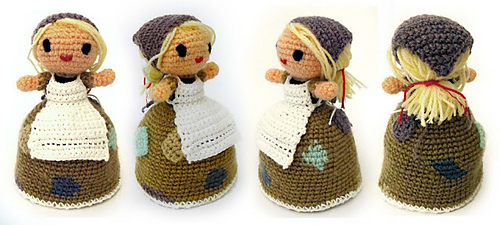
This is a Cinderella flip doll. One side is Cinderella when she had to work for her stepmother and the other is the princess Cinderella. It's all one doll. You simply flip up the dress to reveal the other doll. I had a fabric Goldilocks and the three bears flip doll when I was younger and I've always thought it was a really cool idea.

So far this is the only pattern like it that I have seen and the best part is that it's free and available in multiple languages! Here's the link: Magic Cinderella Doll.

Here's how mine turned out. I'm very pleased with it. One more thing to add to my collection. I'll have to get creative in the way I display all my new crochet friends since I seem to be running out of shelf space in my room. 


She turned out great! There are so many possibilities available with this pattern and a little tweaking. I'm not that found of dolls, but I plan on deigning a pattern or two based on this pattern as a reference. Hopefully they'll turn out nice!


Monday, August 11, 2014

Doll Daisy Blanket

A while ago I made a pretty pink daisy blanket for my sister using the pattern posted on tillietulip's blog. It was the perfect princess blanket that was totally her.
Pattern: Daisy Pattern 


She loves it so much that I decided to try making a doll blanket using the same pattern so she and her doll can have matching blankets.


The cool thing was I learned a new skill for tillie tulip's blog, it's called the join-as-you-go method. Instead of having to sew each square of a blanket together after crocheting them all I crochet all but the last row, in this case pink, of each square and then crochet them together. I love this idea and I feel like it saves the time to sew everything together.

Wednesday, August 6, 2014

Dogs!

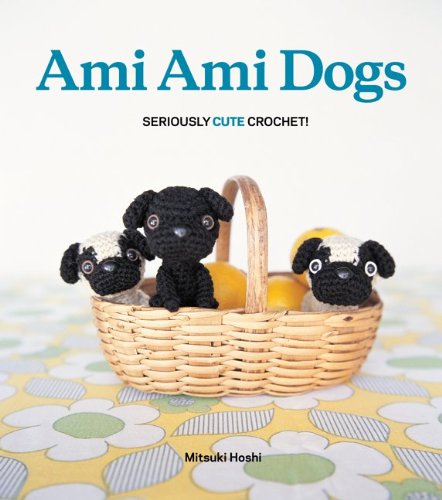
After crocheting my little owls I searched the internet for other cute amigurumi patterns that I could create. I made a guinea pig and parakeet. But then I found a book that is totally me. Ami Ami Dogs is full of adorable little puppies to crochet. 


So I ordered the book and some craft eyes for my new creations. I also had to make a trip to the store to pick out the perfect puppy colors. Luckily I found a preview pattern from the book online so while I eagerly awaited my  new book I crocheted my first dog.


All it took was that one dog and I as hooked! It turned out so cute. Other than putting my back legs a little to far forward the dog turned out perfect for me. My book came and before long I had a posse of little crochet dogs! They took such a tiny hook that I had to get one with a grip so I wouldn't hurt my hand by crocheting to much.


Somebody turned out to be a little jelous of my creations. If I left them on the table Benson would take them. He even managed to grab them out of my backpack when I left the pouch they were in unzipped. So I decided to use and bigger pattern to make him a puppy of his own. 


So far I have made all but two of the dogs in the first book so now I have Ami Ami dogs 2 on hold from the library so I can make some more. I guess I'll never be to old for stuffed animals, especially stuffed puppies!


Wednesday, July 30, 2014

Little Owls


So, I recently learned of a simple pattern to make little owls. Usually I stay away from little crochet animals because they seem tedious and complicated, but these owls were very simple and fun to make. The body was created in one piece, making it a very manageable project, and then I sewed the eyes, nose and feet on. The eyes I just hot-glued on when I was all done. I didn't have the special colored eyes that were in the pattern, but my googly eyes work for me.


Here's the link to the pattern if anyone wants to try it: http://www.ravelry.com/patterns/library/nesting-rainbow-owls.


When trying to get a nice shot of my first owl I realized I had a jealous puppy. Not only had I just spent all that time crocheting this little thing, now I was taking pictures of it instead of him. He tried and was very successful at getting into every shot. But don't worry, I paused in my creativity and gave him a photo-shoot as well.


Now, back to the owls.


Sewing a ring onto the top of these owl's head would turn them into a cute key-ring or addition to a bag or purse. Now I'll just have to find a place to keep my new friends!


Thursday, July 17, 2014

Mini Puppy Blanket

I finished Benson's matching puppy blanket! I think it is adorable.


It's just the perfect size for my little baby. I did a simpler border on his since he is a boy and might not appreciate a fancy border. Everything is sewed down, though not all sides of the ears are sewed onto the squares, so he shouldn't be able to pull off parts of the face or the bones. I think it should hold up very well, but only time will tell.


He doesn't seem to know quite what to do with his new blanket, but I think he likes it. Now we can each sleep with a matching blanket and have a reminder of each other every night.


I hope it will bring him good, sweet dreams tonight!

Tuesday, July 8, 2014

Cow Hat

Coming up this Friday (July 11th) is Cow day at Chick-fil-a! When you come dressed as a cow you get a free sandwich. I love chick-fil-a and I love free food so I had to come up with how to dress as a cow. For me the most obvious option was a cow hat pattern I had seen on RepeatCrafterMe's blog.

I had made the cow hat earlier as a doll hat and loved it so I adjusted the pattern a bit to work as a big hat for me to wear. I love the finished product! I've made many animal hats, but I have to say this is one of my favorites. 


Right now I plan on wearing a white shirt and taping on black spots to finish the outfit. If I can find black shoes and gloves, they can be my hooves. And finally I thought about crocheting a tail, but decided to braid one as well.


So now I'm all ready. Now I just have to wait until Friday and then get dressed up and go to Chick-fil-a!


Friday, June 20, 2014

Favorite Blanket

Online I saw a picture of a crochet blanket that was completely me so I had to make it. I found the pattern and other than changing a few colors, pretty much followed the directions. I loved the pattern so much that I finished the blanket faster than normal and soon had a blanket that I adore!


Now I am working on a smaller version of this blanket for my puppy. Call me crazy but my baby needs a baby blanket handmade by his mommy.


I've decided to have his blanket be a three by three square of this corner of my bigger blanket. Also since my baby is a boy I'll revert to the original colors of yellow and green instead of purple and pink.


He seems to enjoy my sleeping with my blanket so soon he will have one of his own!


Printfriendly