Monday, October 5, 2015

Olaf Gloves Pattern


Materials
Red Heart Yarn in white, black, orange, and brown
Hook: I
Tapestry/ Yarn Needle

This glove pattern starts at the bottom and works its way up the glove.

Base of the glove
With white yarn
Round 1: fdc 25, join together to form a loop, ch 2 (25 dc)
Round 2: dc in each dc, ch 2 (25 dc)
Round 3- 7: dc in each dc, ch 2 (25 dc)

For right glove
Round 8: dc in 20 dc, ch 5, attach to beginning of round, ch 2 (20 dc, 5 ch)
Round 9: dc in each dc, dc in each chain (25 dc)
Round 10 - 11: dc in each dc (25 dc)
Round 12: sc in each dc (25 sc)
tie off leaving tail to sew onto glove

For left glove
Round 8: dc in 5 dc, ch 5, sk 5 dc and dc in last 15, attach to beginning of round, ch 2 (5 dc, 5 ch, 15 dc)
Round 9: dc in each dc, dc in each chain (25 dc)
Round 10 - 11: dc in each dc (25 dc)
Round 12: sc in each dc (25 sc)
tie off leaving tail to sew onto glove

Mouth
With black yarn,
Row 1: 8 fsc, ch 1, turn
Row 2: sc in each sc, ch 1, turn (8 sc)
Row 3: scdec, sc in next 4 sc, scdec, ch 1, turn (6 sc)
Row 4: sc in each sc, ch 1, turn (6 sc)
Row 5: scdec, sc in next 2 sc, scdec, ch 1, turn (4 sc)
Row 6: sc in each sc, ch 1, turn (4 sc)
Row 7: scdec across, ch 1, turn (2 sc)
Row 8: scdec (1 sc)
sc around the edges, tie off leaving long tail to sew on

Teeth
Wth white yarn,
Row 1: 4fsc, ch 1, turn
Row 2-3: sc in each sc, ch 1, turn
tie off leaving long tail to sew on

Nose
With Orange yarn,
ch 3, turn
sc in first ch, hdc in next sc
tie off leaving long tail to sew on

Eyes
Start with black yarn,
Round 1: 6 sc into magic ring, sl st to begining sc, ch 1 (6 sc)
Switch to white yarn
Round 2: 2 sc in each sc, tie off leaving long tail to sew on (12 sc)

Eyebrows
With brown yarn,
ch8, tie off leaving long tail to sew on

Finally lay out all the pieces and sew them onto the glove. Sew in all the loose ends.

* While I've done my best to write up the pattern there may be errors. Let me know if you're having trouble following the pattern or if you see a mistake. Enjoy!

Monday, September 14, 2015

Market Bag

I love bags! Some bags are great because of their design and others I love because they are quick and easy. This bag pattern is the Market Tote from Lauren. While I believe this pattern was created for little girls I like the size as a purse for myself. 


I decided that I wanted mine to be two colors so I used two strands of Pound of Love yarn and I love the effect it had. As always I lined my bag so my pens and pencils don't fall out between the stitches.


This bag is simple, yet beautiful.

Monday, August 31, 2015

Angry Bird Red Hat

A while ago I posted my bomb angry bird hat pattern. Around the same time I created a red angry bird hat to, but I never got around to typing up the pattern. Luckily my notes were good enough that I was able to decipher what my pattern was.


The base of all my ear-flap hats is from RepeatCrafterMe's hat patterns, so the credit goes to her. I make most of my hats adult size because even children can wear them and have room to grow. You can get the base hat pattern here.

Materials
H Hook (5.0 mm)
Red Heart Yarn in White, Black, Red and Yellow
Tapestry Needle
Stuffing

I crocheted the base hat in red and then did the trim in white.

Now for the fun part: turning the plain hat into an angry bird!

Eyes (make 2)
Make with White Yarn
Magic ring, 6sc in magic ring and join to first sc, ch 2 (6 sc)
Round 1: 2 dc in each sc, join to first dc, ch 1 (12 dc)
Round 2: 2 sc in each dc, join to first sc, ch 1 (24 sc)
Round 3: *2 sc in first sc, sc in next sc* repeat (36 sc)
Tie off leaving a long tail to sew onto the hat

Take a piece of black yarn and embroider a black dot in the eye.

Nose
Make  with Yellow Yarn
Row 1: 8 fsc, ch 1, turn
Row 2: sc dec, sc 4, sc dec, ch 1, turn
Row 3: sc dec, sc 2, sc dec, ch 1, turn
Row 4: 2 sc dec, ch 1, turn
Row 5: sc dec
sc around the whole nose
tie off, leave long tail to sew onto hat

Eyebrows (make 2) 
Make with black yarn
Row 1: 10 fsc, ch 1, turn
Row 1: sc in each sc (10sc)
Tie off leaving a long tail to sew onto the hat

Longer Top Feather
Make with Red Yarn
6sc in magic ring
Round 2-10: sc in each sc

Smaller Top Feather
Make with Red Yarn
6sc in magic ring
Round 2-7: sc in each sc

Now lay all the pieces out and sew them on!


* While I've done my best to write up the pattern there may be errors. Let me know if you're having trouble following the pattern or if you see a mistake. Enjoy!

Monday, August 24, 2015

Granny Messenger Bag

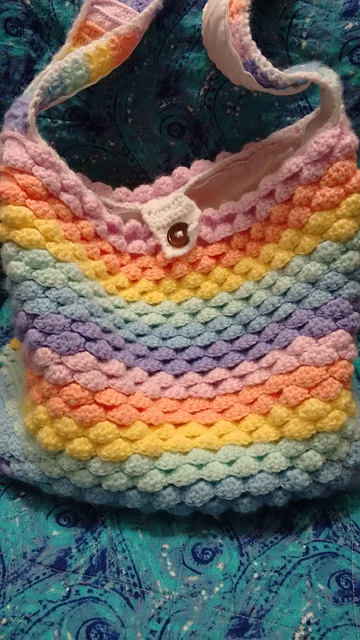
I love the messenger bag I created using Moogly's pattern. Not only did I love the stitches she used, the bag was simple to make and put together. So I decided to design a bag of my own using the same technique to make a messenger bag.

I had a bunch of different stitches I thought would be perfect as a messenger bag but finally settled on a classic, granny stripes. I think it turned out great!


Materials
Pound of Love
I/9 crochet hook
Tapestry Needle

Front Piece: 13" wide by 12" long
Row 1: 52 fdc, turn
Row 2: ch 3, dc in first dc [skip 2 dc, 3 dc in next dc(cluster)} repeat until 3 dc are left, skip 2 dc, 2 dc in last dc, turn
Row 3: ch 3, work 3 dc in space between clusters, work cluster in each space, at the end dc in top of ch 3, turn
Row 4: ch 3, dc in space between previous ch 3 and 1st cluster, work cluster in each space, 2 dc in final pace, turn
Row 5: ch 3, work cluster in each spcae, dc in ch 3
Row 6- 33: Repeat rows 4 + 5

Back and Flap Piece: 13" wide by 24" long
Row 1: 52 fdc, turn
Row 2: ch 3, dc in first dc [skip 2 dc, 3 dc in next dc(cluster)} repeat until 3 dc are left, skip 2 dc, 2 dc in last dc, turn
Row 3: ch 3, work 3 dc in space between clusters, work cluster in each space, at the end dc in top of ch 3, turn
Row 4: ch 3, dc in space between previous ch 3 and 1st cluster, work cluster in each space, 2 dc in final pace, turn
Row 5: ch 3, work cluster in each space, dc in ch 3
Row 6- 66: Repeat rows 4 + 5

Side and Bottom Pieces: 3" wide by 37" long 
Row 1: 13 fdc, turn
Row 2: ch 3, dc in first dc [skip 2 dc, 3 dc in next dc(cluster)} repeat until 3 dc are left, skip 2 dc, 2 dc in last dc, turn
Row 3: ch 3, work 3 dc in space between clusters, work cluster in each space, at the end dc in top of ch 3, turn
Row 4: ch 3, dc in space between previous ch 3 and 1st cluster, work cluster in each space, 2 dc in final pace, turn
Row 5: ch 3, work cluster in each spcae, dc in ch 3
Row 6- 98: Repeat rows 4 + 5


Assembly
Line Up the Side and Flap Piece along the Front and Back Pieces.
Sc them together making sure to leave the flap open.


Sew a button to the middle 5th row at the bottom front of the bag.

Handle: 2" wide by 40" long
Row 1: 9 fdc, ch 2, turn
Row 2-80: DC in each dc, ch 2, turn

Sc around all the edges.

Lining
To make the bag extra sturdy as well as stop things from falling between the stitches. I used Muslin to line the bag because its not to expensive and it does the job.

I make it using two pieces.
First I cut a piece for the bottom of the bag. It needs to be a little bigger than the bottom to allow room for the seams. It should be about 4 1/2" wide by 14 1/2" long.

Then I cut a piece for the sides of the bag. It should be big enough to circle the whole bag, allowing room for the seams and longer than the height of the bag with extra room for the seams and to fold the top over to hide the raw edges. It should be about 35" wide by 16" long.

Now I sew the bigger piece of muslin closed and iron the seam open.


Then I pin the big piece to the bottom piece making sure the seam is on the outside.


I put the lining inside the bag to make sure it fits well and then fold down the top edge twice and pin it to hide the raw edges and make the lining the right height for the bag. I'm sure you could just fold and make sure the lining measures 12", but I like to check inside my bag to be sure.


It's also important to line the handles so they won't stretch.
I cut a piece that is 5" wide by 45" long. Fold the piece in from either side and then in half so that it is 2" wide.


Attaching
Once all the lining is sewn, pin the lining to the handle leaving the extra hang inside on either side. Sew the handle down.
Pin the lining inside the bag along the top row. Sew around the top row, making sure the go over the extra handle so that it is attached to the main bag lining as well.


* While I've done my best to write up the pattern there may be errors. Let me know if you're having trouble following the pattern or if you see a mistake. Enjoy!

Monday, August 17, 2015

Leia Lovey

I have been eyeing some lovey patterns online for a while and I finally broke down and bought one to try out. I used the Pretty Princess Lovey pattern by Briana Olsen because Amy McAnderson has a bunch of variations of this pattern to make the Disney princesses.

I wanted to start with a simple doll and since I love the Star Wars characters I've been crocheting I decided to make Leia as my fist lovey. She turned out great.


She is both a doll and a small security blanket, the perfect size for little hands. 


I'm not sure which princess I should make next. I'm thinking either Anna, Pocahontas, or the two-toned Aurora.

Monday, August 10, 2015

Nautical Knots Tote Bag

I love bags and the bigger the bag the better. This pattern was one of the few paid patterns I use. I got it because I wanted to make a friend something to encourage her to have fun over the summer and this looked like a great beach bag. 

It's called "Nautical Knots" Beach Yarn/ Tote Bag by Jennifer Pionk. The pattern came with instructions for two sizes. I made the smaller one because that suited my needs.


Sadly I forgot to take pictures of my first bag, but I decided I also needed a nice big bag. After some contemplation I decided to do it in Towson colors since I'm want to show my school spirit. I will definitely be using it to carry my books this fall though right now my yarn is in it.

I found the pattern easy to follow and I love how the top is double layered making it extra sturdy. Though the pattern didn't say to I lined my bag to make it extra durable. The stitches are pretty tight though and it didn't necessarily need the lining to be useful.

I also love the handles. I've never made handles like them and they are cool and easy to make. If you're looking for a big bag I would definitely recommend this pattern.


Monday, August 3, 2015

Doll Hat

So, I absolutely love the hats RepeatCrafterMe shares. They're perfect for little kids and those like me who will always be kids at heart. But I thought they would be even more perfect if I made matching doll hats. I loved matching my doll when I was little just like so many little girls.

This is the base hat I use for my doll hats

Materials
Size H/5.0mm hook
Worsted Weight Yarn- I use Red Heart Super Saver
Tapestry needle


Magic Ring, 11 dc in magic ring, join, ch 2
Round 2: 2 dc in each dc, join, ch 2 (22 dc)
Round 3: [2 dc, dc] repeat, join, ch 2 (33 dc)
Round 4-9: dc in each dc, join, ch 2 (33 dc)

Earflap
Ch 1, sc in next 8, ch 1, turn
Row 2: sc dec, sc in next 4, sc dec, ch 1, turn (6 sc)
Row 3: sc across (6 sc)
Row 4: sc dec, sc in next 2, sc dec, ch 1, turn (4 sc)
Row 5: sc across (4 sc)
Row 6: 2 sc dec, ch 1, tirn
Row 7: sc dec, tie off, weave in ends
Repeat for 2nd earflap

At any point on the hat join yarn and sc around the whole hat and ear flaps.

Weave in all the loose ends.


Then all the pieces have to be crocheted slightly smaller if you're using a RepeatCrafterMe Pattern so that they'll look right on the smaller hat, but how to do that varies by hat design.

* While I've done my best to write up the pattern there may be errors. Let me know if you're having trouble following the pattern or if you see a mistake. Enjoy!

Monday, July 27, 2015

Star Wars Crochet


A while ago I ran across pictures of crocheted star wars figures, but was sad to learn I had to wait before I could get my hands on them because they were being put into a book/kit. Now the kit has been out for a while and I have completed half of the characters. 


These patterns were created by Lucy Collin and can be purchase in the Star Wars Crochet Kit. I have seen them in Michaels, but I ordered mine from Amazon.

I have found the patterns easy to follow and I love the finished product. My only struggle is finding the right color yarn which is the main reason they are not all done yet. But I think I have found greens that match well enough for me so I am currently working on the rest of the characters.


So far my favorite is R2-D2. I love how his legs swivel around. But I definitely need to make Luke next. 

Monday, July 20, 2015

My Favorite Purse Pattern

I found a crochet purse pattern a while ago that I absolutely love! It uses African flower motifs as the main design. The flowers are very pretty and using different color combinations creates a totally new look for each new bag.

Here are just a few that I have created:


So far those are my favorite purses. I've made one for myself which I use all the time and my sister loves hers as well. I'm so happy my mom showed me how to sew the linings for the purses; it makes the purses so much sturdier. They don't stretch out and nothing falls through the little holes in the crochet part.
Here's the link to the pattern African Flower Bag.

Monday, July 13, 2015

Boy Messenger Bag

While me and my sister were enjoying our new messenger bags my brother decided he would like one as his own. I often feel bad that I crochet my sister so many things and barely make my brother anything buy she loves everything I make and I fall in love with more feminine patterns.

After a bit of searching I was unsatisfied with the messenger patterns available online so I decided I would make my own using the technique I used to make my sister's bag. But his was going to be simply double crocheted.


Sadly I didn't record my stitch counts, but it is a simple pattern so I'll explain what I did.
Materials
Simply Soft and Pound of Love Yarn
Hook: I
Tapestry/ Yarn Needle

Base Rectangle
Row 1: fsc until it reached 15 inches long.
Rows 2-?: sc in each stitch until it is 3 inches long

Sides
Attach yarn to one corner, ch 1
Round 1: sc in each stitch around in each sc, join
Round 2: ch 2, dc in each sc, 
Round 3-(26): ch 2, dc in each dc (until the sides are 10 inches tall; don't tie off)
Flap
Row 1: dc along the back (the # fdc used for the base rectangle), turn
Row 2-(26): ch 2, dc in each dc (until the flap is 10 inches long), tie off

Handle
Row 1: On one side of the flap dc (the # rows in base rectangle), turn
Row 2- (34): ch 2, dc in each dc
Repeat on other side of the flap
Sew their edges together. (You can make the handle longer or shorter based on your preference by adding or subtracting rows.)

You can use any stripe pattern or make the bag on e plain color, but the color sequence I used was:
4 turquoise
2 black
4 green
2 black

Then I lined the bag. The handle is folded and stitched together with some fabric lining inside to make it more sturdy and stop it from stretching.

It looks great for a boy and he calls it his satchel. 
Now all three of us have bags we constantly use. His first excursion with his new bag was to the library where he filled it full of books. It made me cringe slightly to see so much weight in it, but it is holding up nicely.

* While I've done my best to write up the pattern there may be errors. Let me know if you're having trouble following the pattern or if you see a mistake. Enjoy!

Monday, July 6, 2015

Rainbow Messenger Bag

Since I love my messenger bag so much my sister thought she should have one too. My messenger bag is perfect for me and when browsing the internet I found one that was perfect for her to.

I made my sister a rainbow bag and she loved it. It is the Spring Messenger Tote by Susan Gater on Ravelry. I love the pattern, but it was more time consuming for me to make. 

To make her bag durable I lined it as well. I didn't take pictures when making the lining, but maybe later I'll explain how I create my linings.


 She now uses her bag just as much as I use mine.

Now I want to try out her Spring Petals Backpack but that'll have to wait until I finish some of my current projects.

Monday, June 29, 2015

Moogly's Mesmerizing Messenger Bag

I'll start out by sharing a bag I have fallen in love with and use constantly:

I love messenger bags! And I love this simple yet elegant stitch pattern. Before making the bag I thought they might be difficult to make, but moogly explains and illustrates her simple steps  very well so that I had no problem making my bag.


Moogly gives her own instructions for how to line the bag. Lining crocheted bags is well worth it. It makes the bag so much more durable, it stretches less and nothing falls through the stitching. I sewed my lining a little differently than she did but it turned out great.


This is the bag I use the most now. I use it when shopping for more yarn, going to work or heading out on errands. I've got so many compliments on this bag I almost want to make another one, but my want to crochet list is a little long so I might not get to that for a while.

Saturday, June 27, 2015

Catching Up

So, I haven't posted in a while, a very long while. Work and school have been taking up much of my time. Even though I've been busy I have still found time to crochet. I've tried various new patterns, some I love and others were worth the experience but I won't be attempting again for a while.

I'm working on some posts about patterns I've fallen in love with and others that I have created.

Also, I have created an Instagram account so I can post pictures of what I'm working on and follow some other crocheters. I haven't posted much yet, but it'll be coming soon so don't miss it!


Monday, January 19, 2015

Olaf Scarf #2

Another Olaf Scarf!

This Olaf scarf is more 3-d than my first one. But the fun thing about multiple Olaf scarf patterns is you can mix and match the sides to create your own combination. 
I love Olaf!


Materials
Yarn: Pound of Love in White and Orange
          Simply Soft Black and Brown
Hook: I-9
Yarn Needle
For this scarf I crochet on side, then beginning in the middle I repeat on the other side.

Starting on the white side
Row 1: 15 fdc, ch 2, turn
Row 2-60: dc in each dc, ch 2, turn

Other Side also in white
Row 1: dc in the bottom of each fdc (15 dc)
Row 2-60: dc in each dc, ch 2, turn

Eyebrows -make 4
With brown yarn
ch 8, tie off leaving tail to sew on

Eyes -make 4
With black yarn
Round 1: 6sc in magic ring, join to first sc, ch 1 (6 sc)
With white yarn
Round 2: 2sc in each sc, join to first sc, ch 1(12 sc)
in black sew onto scarf

Nose -make 2
Round 1: 6 sc in magic ring (6 sc)
Round 2-4: sc in each sc, join to first sc, ch 1 (6 sc)
Round 5: *2sc in first sc, sc in next 2 sc* repeat twice, join to first sc, ch 1(8 sc)
Round 6-9: sc in each sc, join to first sc, ch 1 (8 sc)
Tie off leaving long tail to sew on

Mouth -make 2
Row 1: 6 dc into magic ring, do not join to first dc, ch 1, turn (6 dc)
Row 2: 2 dc in each dc, ch 1, turn(12 dc)
Row 3: *2dc in first dc, dc in next* repeat, ch 1 (18 dc)
Hdc along bottom, tie off leaving long tail to sew on

Teeth make 2
With white yarn
Row 1: 4fdc, ch 1, turn (4 dc)
Row 2-3: dc in each dc, ch 1, turn (4 dc)
tie off leaving tail to sew on

Buttons - make 6
With black yarn
Round 1: 6 sc in magic ring, ch 1, turn (6 sc)
Round 2: 2 sc in each sc, tie off leaving tail to sew on (12 sc)

Hair
side hairs- make 4
With brown yarn
ch 8, tie off leaving tail to sew on
middle hair- make 2
With brown yarn
ch 10, tie off leaving tail to sew on

Arms - make 4
12 fdc, 
Hand at end of arm ch4, tie off leaving extra yarn to sew back in
attach yarn, ch 4 (3 times)- total of 4 fingers

Lay out the pieces and sew them on either side.

Monday, January 12, 2015

Olaf Scarf Pattern #1

When I think of winter I think of bundling up to go out and build a snowman. But here's a snowman you can 'build' inside that will keep you warm when you go outside to brave the cold throughout the winter!


Materials
Yarn: Pound of Love in White, Blue, and Orange
          Simply Soft Black and Brown
Hook: I-9
Yarn Needle

For this scarf I crochet on side, then beginning in the middle I repeat on the other side.

Starting on the white side
Row 1: 15 fdc, ch 2, turn
Row 2-60: dc in each dc, ch 2, turn

Blue Side
Row 1: dc in the bottom of each fdc (15 dc)
Row 2-60: dc in each dc, ch 2, turn


Eyebrows -make 2
With brown yarn
ch 8, tie off leaving tail to sew on

Eyes -make 2
With black yarn
Round 1: 6sc in magic ring, join to first sc, ch 1 (6 sc)
Switch to white yarn
Round 2: 2sc in each sc, join to first sc, ch 1(12 sc)
Switch to blue yarn
Round 3: *2sc in first sc, sc in next sc* repeat 6 times, join to first sc, ch 1 (18 sc), tie off leaving tail to sew on

Nose
Row 1: 4fsc, ch 1, turn
Row 2: sc in each sc, ch 1, turn (4 sc)
Row 3: scdec twice, ch 1, turn (2sc)
Row 4: sc in each sc, ch 1, turn (2sc)
Row 5: scdec, ch 1, turn (1 sc)
Row 6: sc, tie off leaving tail to sew on

Mouth
With black yarn
Row 1: 8 fsc, ch 1, turn (8 sc)
Row 2: sc in each sc, ch 1, turn (8 sc)
Row 3: scdec, sc in next 4 sc, scdec in last sc, ch 1, turn (6 sc)
Row 4: sc in each sc, ch 1, turn (6 sc)
Row 5: scdec, sc in next 2 sc, scdec, ch 1, turn (4 sc)
Row 6: sc in each sc, ch 1, turn (4 sc)
Row 7: 2 scdec, ch 1, turn (2 sc)
Row 8: sc, tie off leaving tail to sew on

Teeth
With white yarn
Row 1: 4fdc, ch 1, turn (4 dc)
Row 2-3: dc in each dc, ch 1, turn (4 dc)
tie off leaving tail to sew on

Buttons - make 3
With black yarn
Round 1: 6 sc in magic ring, ch 1, turn (6 sc)
Round 2: 2 sc in each sc, tie off leaving tail to sew on (12 sc)

Lay out pieces and sew onto the white side of the scarf.

Tassels -on both sides of scarf
Cut strands of white yarn, taking 3 of them loop through the bottom of the scarf

Now for the part of the scarf that I am not experiences at.
On the blue side embroider "I Like Warm Hugs" and add snowflakes around it. When I embroidered it I tried to keep all the yarn on one side so the back still looks plain blue.


What a cute scarf! It looks so fun and goes perfectly with my other Olaf accessories.


But, I created 2 types of Olaf scarves. Soon I will have the second pattern posted.


Printfriendly